WorkFlows - Toolbar Management
About
This article and video tutorial (below) provide a brief overview of WorkFlows toolbar management and include instructions for adding wizards, removing them, renaming them, etc.
Why Customize?
Customizing your toolbars can make WorkFlows easier to navigate for staff and volunteers. You can remove the wizards you don't use and make the ones you need easier to find, which saves time and lessens the chance that staff or volunteers will use the wrong wizard by mistake.
Toolbar Files
When you open the toolbar management window (directions to follow) you'll see three panes, each with a different set of toolbar files: Delivery, Customized and Local.
Delivery
Delivery files appear on the left. They're included by SirsiDynix when you install or update WorkFlows, so you can access them from any workstation. These files contain the system's basic toolbars that can be copied over to the Customized and Local toolbar files; however, they cannot be added to, modified or deleted.
Customized
Customized files appear in the middle. They've been created by the MSC system admin and saved on the server, so you can access them from any workstation. These files contain toolbars that can be copied to the Local toolbar.
Local
Local files appear on the right. They're specific to the workstation. These files contain toolbars that can be added to, modified or deleted. Any saved changes to these files will be reflected on the workstation only.

Don't worry if you don't see all your modules and wizards in this section. Only modules and wizards you've customized for the workstation specifically will appear here.
If you haven't customized the
Offline module or its wizards, for example, they won't appear in your
Local Toolbar Files; WorkFlows will assume that you want to use the
Offline files listed in the
Customized pane as your default. If the
Utility module or its wizards don't appear in either the
Local or
Customized panes, the system will assume you want to use the setup in the
Delivery pane as your default.
Adding Wizards
Adding a Single Wizard
Example: Adding the
Onshelf Items wizard to the
Circulation module of a local workstation.
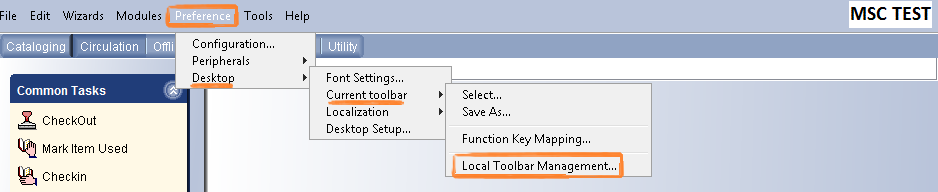
1. Open Local Toolbar Management on the workstation by clicking Preference from the Menu Bar, then selecting Desktop > Current toolbar > Local Toolbar Management.
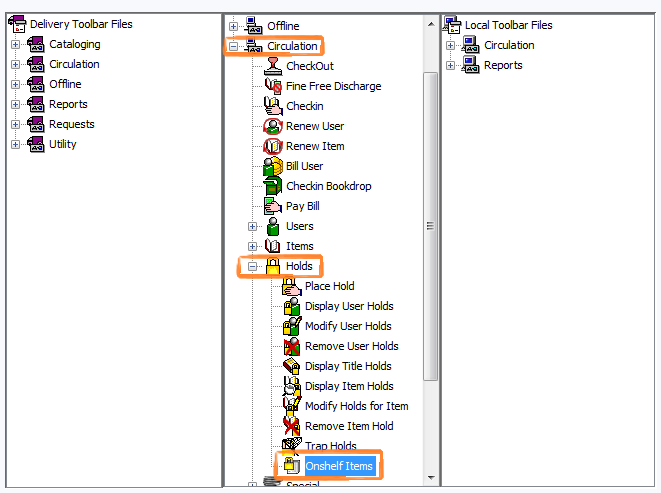
2. Find the wizard you want to add by looking in the Customized or Delivery panes, expanding the modules (Cataloging, Circulation, etc.) and toolbar groupings (Users, Items, etc.) as needed. For example, Onshelf Items can be found under Customized Toolbar Files > Circulation > Holds.
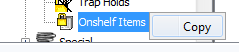
3. Highlight the wizard you want to add.
4. Right-click the wizard and select Copy.
5. In the Local Toolbar Files, find where you want to add the wizard by expanding the modules and toolbar groupings as needed. For example, Local Toolbar Files > Circulation > Holds has been expanded in the screenshot below.
6. Highlight a wizard that you want the new wizard to be next to.

7. Right-click the wizard and select Paste Before or Paste After. The wizard you copied will appear where you indicated.
The
Common Tasks toolbar heading doesn't display, but if you want to add a wizard to
Common Tasks, paste it where you want it to appear among the wizards listed right below the module heading, e.g. Cataloging, Circulation, etc.
Adding Toolbar Groups or Modules
If you want to add a group of wizards (Users, Items, etc.) to your local files so that you can customize it, follow the steps for
Adding a Single Wizard, but copy and paste the group.
If you want to add an entire module (Circulation, Offline, etc.) to your local files so that you can customize it,
right-click the module then select
Copy to Local.
Moving Wizards
Moving a Single Wizard
Example: Moving the
Checkin Bookdrop wizard from the
Special toolbar group to
Common Tasks on a local workstation.
1. Open Local Toolbar Management on the workstation by clicking Preference from the Menu Bar, then selecting Desktop > Current toolbar > Local Toolbar Management.
2. Find the wizard you want to move by looking in the Local pane, expanding the modules (Cataloging, Circulation, etc.) and toolbar groupings (Users, Items, etc.) as needed. For example, Checkin Bookdrop can be found under Local Toolbar Files > Circulation > Special.
3. Highlight the wizard you want to move.
4. Right-click the wizard and select Copy.
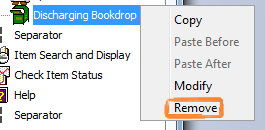
5. WorkFlows won't allow you to have duplicate files, so once you copy the wizard, right-click it again and select Remove.
6. Find where you want to add the wizard by expanding the modules and toolbar groupings as needed.
7. Highlight a wizard that you want the new wizard to be next to. The Common Tasks toolbar heading doesn't display, but if you want to move a wizard into Common Tasks, paste it where you want it to appear among the wizards listed below Circulation (or whichever module you want to move the wizard to).

8. Right-click the wizard and select Paste Before or Paste After. The wizard you copied will appear where you indicated.
Moving Toolbar Groups
If you want to move a group of wizards (Users, Items, etc.) so that they appear in a different order on a local workstation, follow the steps for
Moving a Single Wizard, but copy, remove and paste the group.
Removing Wizards
Removing a Single Wizard
Example: Removing
Suspend User from a local workstation.
1. Open Local Toolbar Management on the workstation by clicking Preference from the Menu Bar, then selecting Desktop > Current toolbar > Local Toolbar Management.
2. Find the wizard you want to remove by looking in the Local pane, expanding the modules (Cataloging, Circulation, etc.) and toolbar groupings (Users, Items, etc.) as needed. For example, Suspend User can be found under Local Toolbar Files > Users.
3. Highlight the wizard you want to remove.
4. Right-click the wizard and select Remove. The wizard will disappear.
Removing Toolbar Groups or Modules
If you want to remove a customized group of wizards or a module from your local files, follow the steps for
Removing a Single Wizard, but highlight the the group or module before removing it.
Renaming Wizards
Example: Changing
Checkin to
Discharge on a local workstation.
1. Open Local Toolbar Management on the workstation by clicking Preference from the Menu Bar, then selecting Desktop > Current toolbar > Local Toolbar Management.
2. Find the wizard you want to rename by looking in the Local pane.
3. Right-click the wizard and select Modify.
4. Change the Display name. Leave the other fields alone.
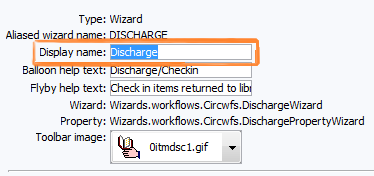
5. Click OK. The new name will now display.
Video Tutorial
Related Articles
WorkFlows - Introduction
About This article and video tutorial (below) serve as an introduction to WorkFlows, its terminology and its properties. What is WorkFlows? WorkFlows is one part of the Symphony Integrated Library System (ILS) used by members of the Montana Shared ...WorkFlows - Installing
About This article covers installing a fresh version of WorkFlows. WorkFlows is meant to be used on library staff workstations only, not personal devices. Follow these instructions if you're installing WorkFlows on a workstation, or a recent ...WorkFlows - Fonts, Themes and Tabs
About This article and video tutorials (below) cover adjusting your WorkFlows desktop preferences, including the font, theme and tab settings. To learn how to customize your toolbars, see WorkFlows - Toolbar Management. Font Customizing To change the ...Circulation - Removing Holds
About This article covers how to remove holds in WorkFlows. Removing Holds You can remove holds in WorkFlows in two (2) ways: Using the Remove User Holds wizard Using the Remove Item Hold wizard Use whichever wizard makes the most sense for you at ...WorkFlows - Function Key Mapping
About This article and tutorial video (below) cover how to assign function keys in WorkFlows Introduction Some F-keys are reserved and you won't be able to assign them. These are F1 (Help), F6, F8 and F10. You cannot assign an F-key to more than one ...